How to Install Vinyl Replacement Windows: A Guide for Homeowners
Upgrading your home’s windows can make it more energy efficient and attractive. Vinyl replacement windows are a popular, affordable choice. This guide will help you install them yourself, making your home better.
Vinyl windows are durable, easy to care for, and keep your home warm. They’re great for improving your home’s look or energy use. We’ll show you how to install them, from start to finish.
Key Takeaways
- Vinyl replacement windows are a cost-effective and energy-efficient option for homeowners
- The installation process involves various tools and materials, including a caulk gun, cordless drill, and insulation
- Proper preparation, measurement, and installation techniques are crucial for ensuring a successful window replacement project
- Homeowners can save money by tackling this project themselves, but hiring a professional installer is recommended for complex or large-scale window replacements
- Vinyl replacement windows can significantly improve a home’s energy efficiency and curb appeal
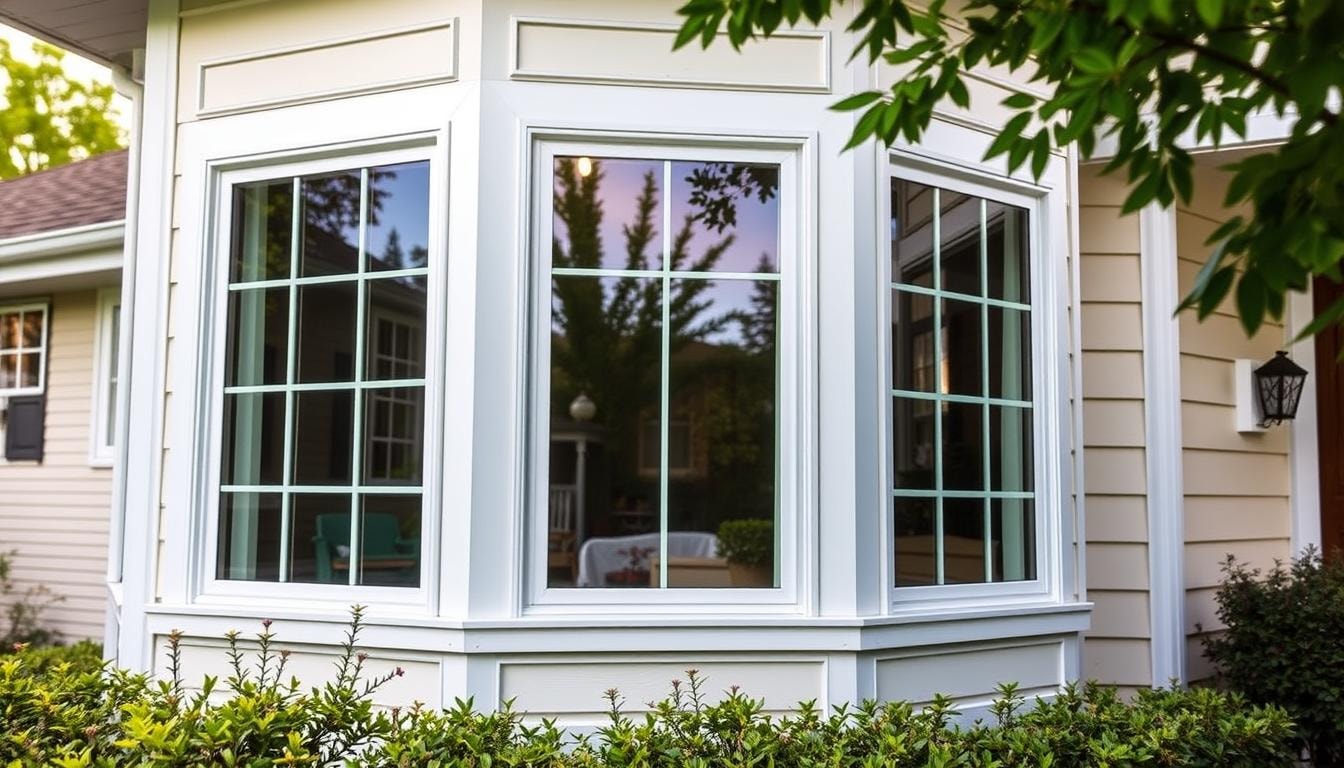
Understanding Vinyl Replacement Windows: Benefits and Types
Vinyl replacement windows are popular for being energy efficient and easy to maintain. They can last 20 to 40 years, depending on climate, upkeep, and how well they’re installed. Expect to spend $300 to $700 per window, including installation.
- Full-Frame vs. Insert Windows: Homeowners can choose between full-frame and insert windows. Full-frame windows replace the whole unit, including the frame and trim. Insert windows fit inside the current frame, saving money for some.
- Energy Efficiency Advantages: Vinyl windows are great at keeping energy in and cold out. They use Low-E glass and argon gas to save up to $500 a year. They also block sound, making your home quieter.
- Cost Considerations: The price of vinyl windows depends on size, style, and quality. They’re cheaper than wood but offer long-term savings and less upkeep. Getting them installed by a pro ensures they work best and last longer.
Essential Tools and Materials for Window Installation
Starting a vinyl window replacement project? You’ll need the right tools and materials. A caulk gun and a cordless drill are key. Each tool is important for a smooth installation.
A level ensures your windows are straight. You’ll also need a tape measure to measure the openings. A utility knife is useful for cutting and preparing the area.
- Caulk gun
- Cordless drill
- Level
- Tape measure
- Utility knife
- Hammer
- Pry bar
- Safety glasses
- Hearing protection
You’ll also need materials like acrylic caulk and insulation. These help seal and insulate the windows. This is important for keeping your home warm and saving energy.
With the right tools and materials, you can make your home look great. Always be safe and follow the instructions for the best results.
Safety Precautions and Preparation
When you’re installing windows, safety comes first. You need to prepare well and use the right gear to avoid injuries. As you start your window replacement, protect yourself and your work area.
Personal Protective Equipment
Good safety gear is key. Always wear safety glasses to keep your eyes safe from debris. Use earplugs or headphones to protect your ears from loud tools.
Gloves are also important. They prevent cuts and scratches from sharp objects or broken glass.
Workspace Setup
- Make sure your work area is clean, bright, and clutter-free. This keeps your space safe and organized.
- Secure any ladders or step stools you need. It’s important for your safety to have them stable and in the right place.
- Have all your tools and materials ready before starting. This keeps your home’s exterior safe during the work.
Lead Paint Considerations
If your home was built before 1978, watch out for lead paint. Lead can be very harmful, especially to kids. Always follow safety rules and local laws when working with lead paint. If unsure, consider getting a professional.
How to Take Accurate Window Measurements
Getting the right window measurements is key for a good fit when you replace your windows. Accurate measurements help avoid expensive mistakes and make sure your new windows work well. First, remove any outer trim to see the window casing. Then, measure the height and width of the casing several times for exactness.
Even though many windows are standard sizes, some might need custom measurements. If you have curved, non-standard, or oddly shaped windows, get help from a pro. Use flexible tape measures and protractors for these special cases.
- Measure the window width at the top, middle, and bottom to account for any variations in the frame.
- Measure the window height on the left, middle, and right sides to ensure an accurate reading.
- For depth, ensure there is a minimum of 3 1/4 inches of opening between the inside window trim and the outside blind stop strip.
Round down your measurements to the nearest 1/8 inch for a snug fit. Taking multiple measurements and having a backup plan can reduce the chance of mistakes. Remember, precise window measurements are vital for a successful window replacement.
Getting help from a professional, like a MILGARD Certified Dealer, can offer tailored service. They can make sure your window measurements are spot on, especially for unique or non-standard shapes. Accurate width measurements are as important as height to get a perfect fit and top performance from your windows.
Preparing the Window Opening and Frame
Before you put in your new vinyl windows, you need to get the window area ready. This means taking out old caulk, insulation, or dirt. Cleaning and checking the area well helps the installation go smoothly.
Removing Old Caulk and Debris
Begin by scraping off old caulk from the frame with a putty knife or utility knife. This makes the surface clean for new caulk. Also, use a vacuum or brush to get rid of dust, dirt, or other stuff from the opening and frames. A clean space is key for a good fit and seal.
Inspecting for Damage
After cleaning, look closely at the frame for damage. Look for rot, cracks, or other problems. If you see big damage, fix it before you start installing. You might need to repair or replace the frame, depending on the damage.
Frame Repairs
- If the frame looks good, you might just need to fix small issues with caulk or wood filler.
- For bigger problems like rot or warping, you might have to replace the whole frame. This is a bigger job but it’s important for a good, energy-saving install.
- If you’re not sure about your frame or how to fix it, get help from a pro.
By carefully preparing the opening and frame, you’re ready for a great vinyl window install. This careful work ensures your new windows fit well and last a long time.
Removing the Existing Window
Before you can install new vinyl replacement windows, you’ll need to remove the existing window. This step lets you check the casing and frame. It makes sure the new window fits right.
Here’s how to remove the old window:
- Start by removing all interior trim around the window sashes. This exposes the fasteners holding the window in place.
- Lift the windowpane to find screws or nails holding the existing window. If you see nails, use a reciprocating saw to cut through them carefully.
- After removing the fasteners, gently pull out the old window from its opening. This lets you see the casing and frame’s condition. It helps with installing the new vinyl replacement window.
Remember to be safe while removing the window. Wear protective gear and keep your workspace clean and safe. With the existing window out, you’re ready for the next steps in your project.
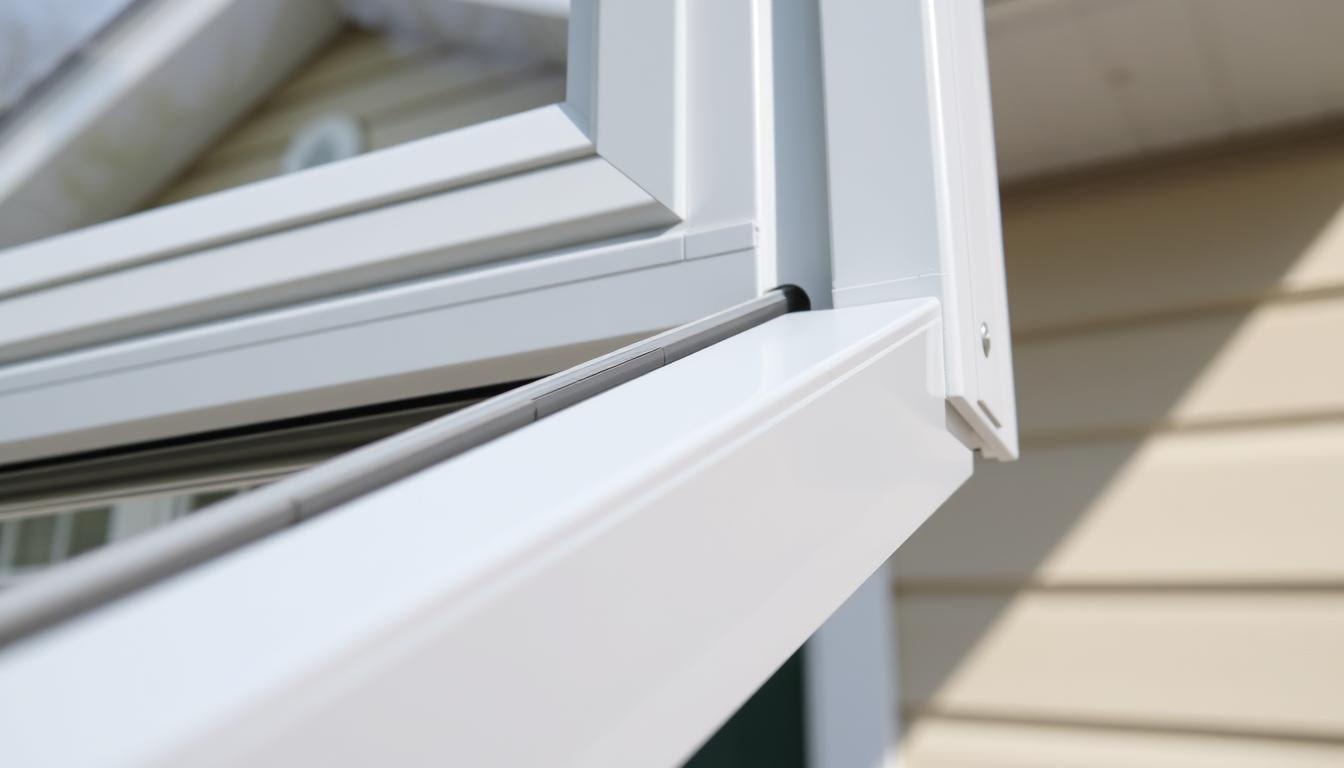
Installing Flashing and Weather Protection
Putting in the right flashing and weather protection is key for your new window’s life and work. It stops moisture from getting in, keeping your home safe from water damage and cold air. Just follow the maker’s rules to add flashing and weatherproofing to your window project.
Start by putting weatherstripping around the window frame. You can use foam tape, tubular weather stripping, or self-sticking spring metal weather stripping. Pick what your window needs and what the maker says is best. Make sure it seals well to keep your window safe from the weather.
- Use foam tape for sealing drafty windows and doors.
- Opt for tubular weather stripping for extra insulation and strength.
- Leverage self-sticking spring metal weather stripping for easier installation.
Then, put on the right flashing materials. For PVC flanged windows, Marvin says to use non-rubberized asphalt flashing. Butyl or acrylic adhesive flashing, like 3M All-Weather Flashing Tape, works better in different temperatures and places.
Make sure the flashing goes at least 2 inches past the top nailing flange and 1/4 inch up onto the window frame. For the header, the head flash piece should go above and past the leg tape edges. Also, the housewrap should be over the head flashing tape for good shingle flashing.
By carefully installing flashing and weather protection, you make a strong shield against the weather. This protects your new window and makes your home’s windows last longer and work better.
Proper Shimming and Leveling Techniques
It’s key to shim and level your vinyl replacement windows right. This ensures they work well for a long time and save energy. Paying close attention to these steps can greatly improve your windows’ performance and life.
Placement of Shims
First, make sure the new window is centered in the frame. Then, use shims to fill gaps and secure the window. Place shims at the top, bottom, and sides, keeping them evenly spaced.
Use a tape measure to check the gaps. This helps keep the installation even and correct.
Checking for Square
After shimming, check if the frame is square. A level will tell you if it’s plumb and square. If not, adjust the shims to fix the alignment.
Getting this right is key for the window’s smooth operation and keeping it weatherproof.
By following these steps for shimming and leveling, your new square vinyl replacement windows will be installed perfectly. This boosts their energy efficiency and performance over time.
Securing the Window Frame
When you put in a new vinyl window, it’s key to secure the frame well. This makes sure it fits tight and lasts long. You do this by putting screws through shims that level and align the frame.
Before you screw it in, drill pilot holes in the shims. This stops the shims from cracking or splitting. Also, open the window first. This makes it easier to get to the screw holes.
- Put the screws through the shims and into the frame carefully. Don’t screw too tight, or it might not fit right.
- Make sure the window is well secured but still opens and closes easily. This keeps it working well for a long time.
By doing these steps, you can make the window frame strong and weather-tight. Always wear safety glasses when working with screw holes and mounting screws.
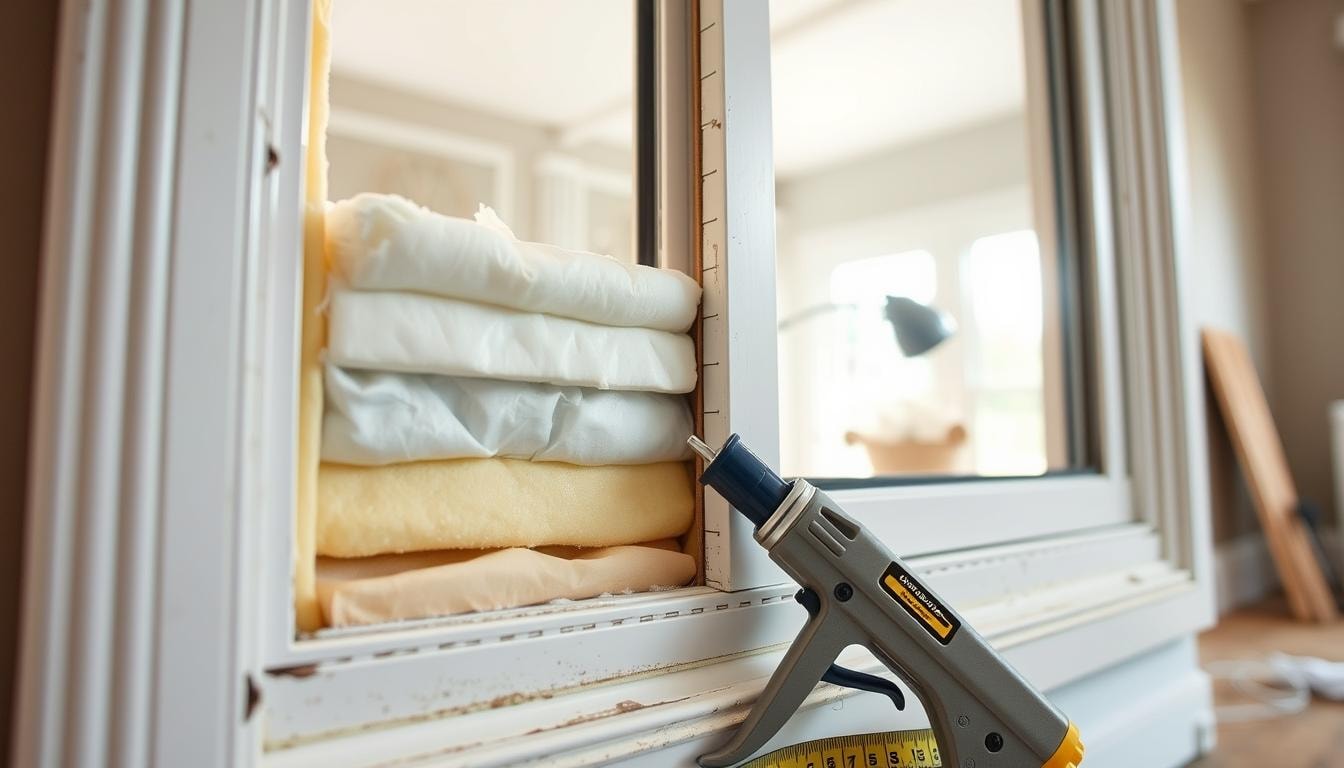
Insulation and Weatherproofing Methods
Insulation and weatherproofing are key for your vinyl replacement windows. They keep your home energy-efficient and performing well. Sealing gaps and using the right insulation materials helps a lot. This way, your windows keep out the weather and lower your energy bills.
- Foam Insulation Application: Expanding foam insulation is great for filling gaps around your new vinyl windows. It makes a tight seal that stops air leaks and drafts. Always follow the foam’s instructions for the best results.
- Sealing Gaps: Sealing gaps around the window frame is also important. You can use backer rods, caulk, or other sealants for this. Sealing these gaps keeps your window installation strong and protects against moisture, air, and pests.
Insulating and weatherproofing your windows well can save you 15-20% on energy bills each year. It’s a small effort that can save you a lot of money over time.
Installing Interior and Exterior Trim
Finishing your window project means adding interior and exterior trim. This step adds the final touches. It makes your new windows look better and work better.
Interior Trim Installation
Begin by putting in new interior window stops. Replace any old or broken ones. Then, put back the interior trim around the window. Fill nail holes and paint or stain for a nice finish.
This trim, like the window casing, makes the window and wall look like one. It makes your space look better.
Exterior Trim Installation
Installing exterior trim is different for each window and home. Measure and cut the window casing to fit the window frame. This ensures a tight seal and a clean look.
Secure the trim with the right fasteners. Use caulking or sealant to keep air and water out.
Quality and correct installation of interior trim and exterior trim matter a lot. They affect how your windows look and work. Make sure your finish is professional and polished.
Caulking and Finishing Touches
As you near the end of your vinyl replacement window installation, it’s time to focus on caulking and finishing touches. This step is crucial for creating a seamless, weather-tight seal around your new windows.
First, apply a high-quality silicone caulk around the exterior of the window frame. Use a caulking gun for precise and even application. Smooth the caulk with your finger or a putty knife for a neat, professional finish. This step helps prevent water infiltration and improves the overall energy efficiency of your windows.
Next, you’ll want to address any remaining gaps or spaces around the window frame. Carefully fill these areas with additional caulk, taking care to create a continuous, unbroken seal. This extra attention to detail will pay off in the long run, helping to maintain the integrity of your new vinyl replacement windows.
With the caulking complete, you can move on to the final finishing touches. This may include painting or staining the trim, cleaning the window glass, and ensuring that all hardware is properly installed and functioning. These last steps will give your newly installed windows a polished, professional appearance.
Remember, proper caulking and attention to the finishing details are essential for maximizing the performance and longevity of your vinyl replacement windows. Take the time to do it right, and you’ll enjoy the benefits of your investment for years to come.
Testing Window Operation and Functionality
After putting in your new vinyl replacement windows, make sure they work right. This is key to get the best performance and weather protection for your home.
Checking Window Movement
Open and close the window a few times. Check if it moves smoothly and works as it should. The sash should slide easily in the frame, and the lock should click into place.
Make sure the window locks tight. This gives a strong seal.
Verifying Weather Seals
Look at the weatherstripping and seals around the window. Check if they are in good shape and working right. Run your hand along the edges to find any gaps or air leaks.
Good weather seals keep the window energy-efficient. They stop air and water from getting in.
If you find problems with the window or seals, fix them fast. Good window function and weather protection are key. They make your vinyl replacement windows worth it, by improving energy use, comfort, and home value.
Common Installation Mistakes to Avoid
Even experienced DIYers can make big mistakes when replacing windows. It’s important to avoid these errors for a good installation. Common mistakes include wrong measurements, bad insulation, and not leveling the window right.
One big mistake is tightening screws too much. This can bend the frame and mess up the window’s work. It’s also key to seal and caulk well to stop air and water leaks. These leaks can cause energy loss and water damage.
- Incorrect window measurements
- Improper insulation around the window frame
- Failure to level the window properly
- Overtightening screws, causing frame warping
- Inadequate sealing and caulking, leading to air and water leaks
Trying to rush or not having the right skills can lead to expensive mistakes. Homeowners should carefully follow the maker’s instructions. If unsure, it’s best to hire pros for the job. Paying attention to details and being well-prepared are crucial for a successful window replacement.
Importance of Hiring Professionals for Windows Installation
Choosing professional window contractors for your home’s windows is key. DIY might save money upfront, but pros offer lasting benefits. Window installation services by experts like 2FL Windows, Siding and Roofing are worth the cost.
Experts bring the right tools, skills, and experience. They ensure your windows are installed right. This means faster work, warranty benefits, and better energy use.
- Most warranties for window products require professional installation to maintain validity.
- Professional window installers are trained to handle various window styles efficiently and uphold safety standards during the installation process, reducing the risk of injuries.
- Hiring professionals for window installation can lead to enhanced energy efficiency, potentially lowering your utility bills.
- Quality windows made with Fibrex® material are designed for durability and longevity, but their full potential is only realized with proper professional installation.
Professional installation services also include a home visit and support after the job. This ensures your windows look and work great. It’s all about quality and making you happy.
Professional window installation offers many benefits. It saves money, boosts energy use, and gives you peace of mind. Choosing experienced window contractors is a smart move for your home’s future.
Upgrade with Budget Windows
Ready to transform your home with energy-efficient, low-maintenance vinyl replacement windows? Contact the experts at Budget Windows today. Our experienced team will guide you through the process, from precise measurements of your existing window frames to the seamless installation of your new windows.
We’ll ensure a perfect fit, with attention to details like the left side sill, so you can enjoy the benefits of improved comfort, energy savings, and enhanced curb appeal. Take the first step towards upgrading your home – call Budget Windows now for a free consultation and let us find the ideal solution for you.
Conclusion
Installing vinyl replacement windows can be a rewarding yet complex project for homeowners. It’s important to do it right to save energy, stay comfortable, and save money in the long run. Whether you choose to do it yourself or hire professionals, knowing the process helps you make smart choices for your home’s windows.
Vinyl replacement windows bring many benefits, like better energy use and a nicer look. When picking windows, think about energy savings, cost, and upkeep. Also, using the right installation methods, like measuring well and sealing tight, makes the windows work better and last longer.
FAQs
How do I properly install replacement windows in my existing window frames?
To install vinyl replacement windows in your existing window frames, first carefully remove the lower sash and top sash of the existing window. Measure the rough opening to order the new vinyl windows that will fit the existing frame. When the new windows arrive, insert the vinyl window completely into the existing frame and secure it using shims to level and square the window jambs.
What steps should I take when installing new construction windows in my house?
For new construction windows, you’ll need to create a rough opening in the wall. Measure the opening and order the new construction windows to fit. Once the windows arrive, insert them into the rough opening and secure the window jambs to the wall framing. Add insulation around the window and apply caulk to seal any gaps between the window and the wall.
How do I properly remove and replace two windows in my home?
Start by carefully removing the interior stops and parting stop to access the existing window frames. Gently remove the lower sash and top sash of the existing windows. Measure the rough openings and order the new vinyl replacement windows. Carefully remove the existing window frames and install the new construction windows, securing them with shims and screws. Add insulation and apply caulk around the perimeter.
What should I consider when ordering new vinyl replacement windows for my house?
When ordering vinyl replacement windows, measure the existing window frames and the rough opening sizes. Pay attention to the window jamb dimensions and order windows that will fit snugly into the existing frames. Consider the energy efficiency ratings, low maintenance features, and styles that complement the architecture of your house.
How do I properly install new vinyl replacement windows in my home’s weight pockets?
First, carefully remove the existing window frames, taking care not to damage the weight pockets in the jambs. Measure the rough opening and order the new vinyl replacement windows to fit. Insert the new windows into the weight pockets and secure them with shims, making sure they are level and square. Add insulation around the perimeter and apply caulk to seal any gaps between the window and the jambs.